
Spider mites: tiny, persistent pests that can quickly damage your plants. Recognizing the key signs and symptoms of a spider mite infestation early is crucial. This article provides you with the key indicators of spider mite damage and then offers practical, step-by-step instructions for creating and applying your own **effective homemade treatments using white oil and insecticidal soap. Let’s tackle these mites head-on and learn how to keep your garden healthy!
Identifying Spider Mite Infestations
The first step in combating spider mites is accurately identifying their presence. Look for these signs:
1.Visual Symptoms on Leaves:
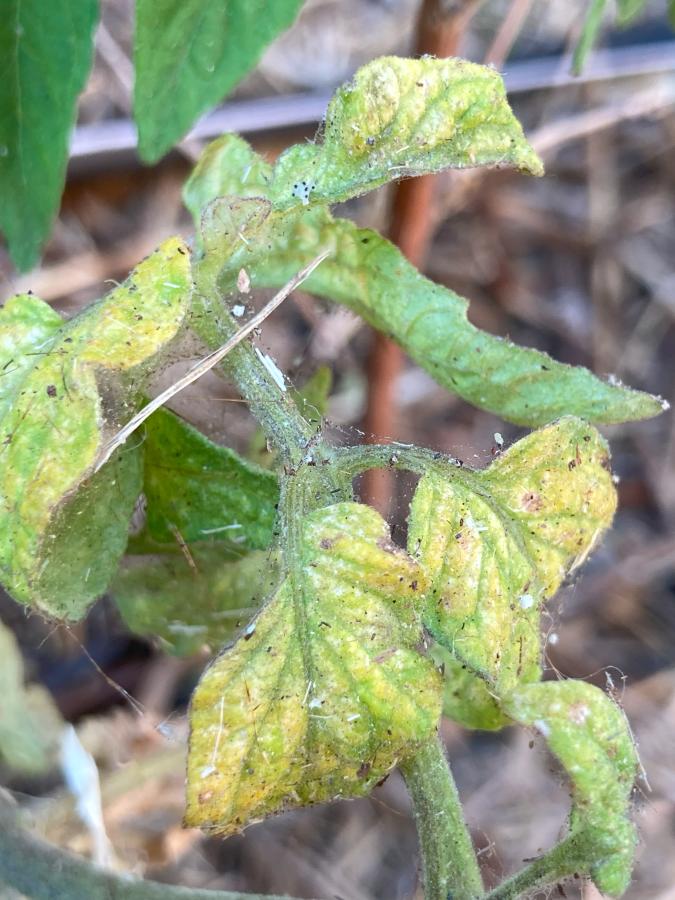
- Stippling: Tiny, light-colored (white, yellow, or silvery) spots on the leaves, almost like freckles. *[Insert Image: Example of stippling on a leaf]* These are where the mites have pierced plant cells.
- Pale or Yellowing Leaves: Larger areas of the leaves may turn pale or yellow, sometimes resembling nutrient deficiency. *[Insert Image: Example of yellowing leaves due to spider mites]*
- Bronzing: On some plants, leaves may take on a bronze or brownish cast.
- Leaf Drop: Severely damaged leaves can dry up, turn brown, and fall off.
- Distorted Growth: New growth might appear stunted, deformed, or twisted. *[Insert Image: Example of distorted growth]*
- Dusty or Gritty Texture: Infested leaves may feel dusty due to mite droppings, shed skins, and webbing.
2.Webbing:
- Fine Silken Webs: Delicate webs, similar to spiderwebs, often found on the undersides of leaves, between leaves and stems, and on new growth. *[Insert Image: Example of fine silken webbing]*
- Heavy Webbing: Extensive webbing covering entire plant sections in large infestations. Mites are often visible within this webbing. *[Insert Image: Example of heavy webbing]*
- Distinguishing from Spider Webs:Spider mite webbing is denser and more closely knit. You’ll likely see the tiny mites moving within it.

3.Observing the Mites Themselves:
- Tiny Moving Dots: Adult mites are very small (less than 1/20th of an inch) and appear as tiny, moving specks, especially on leaf undersides.
- Using a Magnifying Lens: A 10x hand lens or jeweler’s loupe is helpful. Under magnification, you can see their oval bodies and typically eight legs (larvae have six). *[Insert Image: Magnified view of spider mites]*
- Color Variation: Mites can vary in color (pale yellow, green, red, brown, or translucent). Two-spotted spider mites have characteristic dark spots.
- “Shake Test”: Hold a white paper under a suspect leaf and gently tap or shake it. Dislodged mites will appear as tiny, moving dots on the paper.

4. Location of Damage:
- Undersides of Leaves: The most crucial area to inspect.
- Along Leaf Veins: Mites often congregate and feed along the veins on the undersides of leaves.
- Lower Leaves First: Infestations often start on the lower, older leaves and move upwards.
Conditions Favoring Spider Mites: Remember that spider mites thrive in hot, dry conditions and on stressed plants. Plants in these environments are more susceptible.
Treating Spider Mite Infestations with Homemade Sprays
Once you’ve confirmed the presence of spider mites, you can mix your own insecticidal soap or white oil to effectively treat your infected plants. While commercial pesticides are available, making your own solutions is often easier and significantly more cost-effective.
Soap Recipe: DIY Insecticidal Soap for Natural Pest Control
Insecticidal soap is a safe and effective way to manage spider mites and other common garden pests. Here’s how to make your own at home:
What You’ll Need:
- Mild Liquid Soap (No Bleach): 1-2 tablespoons per gallon of water. Look for a gentle dish soap or a mild liquid hand soap.
- Water: 1 gallon (adjust quantity as needed). Use soft or distilled water if your tap water is very hard, as minerals can reduce the soap’s effectiveness.
- Spray Bottle: To apply the solution to your plants.
Instructions:
1. Measure Your Water: Pour the desired amount of water into your spray bottle.
2. Add the Soap: Carefully measure 1-2 tablespoons of your chosen mild liquid soap for each gallon of water. Start with the lower concentration (1 tablespoon) and increase if needed for tougher pests, but be mindful of potential plant sensitivity.
3. Gently Mix: Slowly and gently stir or swirl the water and soap together. Avoid vigorous shaking if there is too much airspace in the sprayer, which can create excessive suds and make application difficult. You want the soap to dissolve evenly in the water.
4. Test on a Small Area (Important!): Before spraying the entire plant, test the solution on a small, inconspicuous leaf or section. Wait 24 hours to check for any adverse reactions like leaf burn or discoloration. If you see any negative effects, dilute the solution further.
5. Apply Thoroughly: Once you’ve confirmed the solution is safe for your plant, spray all parts of the affected plant, including the undersides of leaves where many pests hide. Ensure the pests are directly contacted by the spray for it to be effective.
6. Repeat as Needed: Insecticidal soap works by direct contact, so it doesn’t leave a long-lasting residue. You may need to reapply every 3-5 days, or as needed, to control recurring pest populations.

White Oil Recipe
To make White oil you will need:
Ingredients:
- 2 cups vegetable oil (e.g., sunflower)
- 1 cup mild liquid dish soap (no bleach)
- Water
Instructions:
1. Making the Concentrate: Combine two cups of vegetable oil and one cup of dish soap and shake or stir vigorously. This creates your white oil concentrate.
2. Dilute for Use: For application, dilute one tablespoon of the concentrate into one liter of water (approximately 0.26 gallons).
Important Considerations (for both Insecticidal Soap and White Oil):
- Time of Day: Avoid spraying in direct sunlight or during the hottest part of the day, as this can increase the risk of leaf burn. Early morning or late evening is usually best.
- Plant Sensitivity: Some plants are more sensitive to sprays than others. Always test on a small area first and wait 24 hours and check for any adverse reactions like leaf burn or discoloration. If you see any negative effects, dilute the solution further.
- Target Pests: Insecticidal soap is most effective against soft-bodied insects like aphids, spider mites, whiteflies, and mealybugs. White oil also works well on these types of pests by suffocating them.
- Beneficial Insects: Be mindful that these sprays can also harm beneficial insects if they are directly sprayed. Try to target only the infested areas.
Testing Your Spray:
Before treating your entire plant, it’s crucial to test your solution. Spray a single leaf and observe how it covers the surface.
- Even Coverage: If the spray spreads evenly across the leaf, your mixture is likely correct and will effectively coat pests.
- Beading: If the water droplets bead up and don’t spread, your mixture isn’t right and won’t provide adequate coverage for pest control. Adjust your recipe if needed.
Important Plant Sensitivity Test:
Some plants are sensitive to sprays. Always test your solution on a small, inconspicuous part of the plant and wait 24 hours. If you notice any signs of leaf burn, discoloration, or wilting, dilute your spray further before treating the entire plant.
Applying Your Chosen Spray:
Once you’ve confirmed your plant tolerates the spray, you can proceed with full application.
For even and effective pest control, ensure you spray all plant surfaces thoroughly. A systematic approach helps:
1.Start from the Bottom: Begin by spraying the lower parts of the plant, spraying the undersides of the lower leaves first and working upward. The leaves often droop as they get wet, making the underside harder to reach later, if not sprayed first.
2.Work Your Way Up: Gradually move upwards, spraying the tops and bottoms of all leaves, stems, and any new growth.
3.Spray from All Angles: Position yourself to spray the plant from all sides (front, back, left, and right) to ensure complete coverage and maximize contact with any hidden insects.
Spray from the top:

Spray from the left:

Spray from the right:

Spray from the back:

Spray from the top:

Remember to reapply every 3-5 days until mites are gone.
Good luck with your spider mite problems.