
Growing grains at home can be extremely rewarding. For me, there is nothing better than growing grains in the garden. I think the are beautiful to look at, and I feel some kind of connection to that past. Which is important for me because it helps me slow down in the fast pace world we live in.
Most grains though (expect for corn/maize) need processing to get the seeds out of the hulls, which can be difficult, take time, and can take a lot of effort, and this may keep many away from growing them. Most people have no idea how it is done and if you look it up online you may even see giant machines harvesting the grains. This may also lead some people to think they cant do it at home because they do not have these giant machines.
People harvested grains and ate them before we even had machines, and I want to show people it can be done at home, and how easy it can be with the right tools. This process applies to most grains like wheat, oats, barley, rye, etc. It works for sorghum but I am working on something else for that. I do not think it will work for rice as the hulls are extremely difficult to get off. So difficult, I am not sure why people started growing and eating it.
Corn is an exception, as it doesn’t need to be threshed. All that is needed is to break the ear of corn of the stalk, pull of the husk off. For grain corn all you need to do is rub or pick the kernels out, or if it is sweet corn cook it, easy peasy.
Threshing wheat and other grain at home.
The hardest part about growing grains is threshing and winnowing. Growing them is the easy part, they are grains which are grass, so really all you have to do is water them maybe, and fertilize, maybe. Many of the grains I grow I don’t water, I just plant them in the fall and wait. So threshing and winnowing is most of the work really.
Both threshing and winnowing can seem very arduous and that feeling is not unfounded. Before modern machines took over for manual threshing and winnowing it was a very time consuming and laborious task. It makes me wonder how hungry people actually were when they first started eating and growing grains.
With modern tools almost anyone can thresh and winnow grain with minimal effort and time. At least in comparison to the old ways of doing it.
What is threshing?
Threshing grain is the process of freeing the grain from the hull it is encased in. Which in turn will remove it from the plant. Today this is usually done with a machine, but can still be done with older methods like beating the grain with a flail. Beating the grain with a flail is a very tedious and in my opinion boring way to do it, and this process will almost never get all the grain threshed out anyway.
I have threshed grain with a flail of some kind but I am not sure what it was, it was so long ago. I had the grain, which was wheat, in an old pillow case and began to hit it over and over with the flail. This took quite some time and not all the grain was threshed out, which was disappointing. Oh and the old pillow case, it was never used again, it was totally ruined because of all the fibers and slivers of wheat in it.
After threshing the wheat in this way I decided I was going to find a better way. Threshing with a hand held flail was ridiculous.
Luckily threshing can be done easily at home with a bucket, an electric drill if you have one, and a home made tool which I will show you below. It is very easy to make. If you don’t have an electric drill you can always look for one to buy if you are so inclined and have the money. They are an extremely useful tool. If you won’t or can’t purchase one, many local hardware stores and rental facilities may rent them out, or you can always barrow one from a friend.
How to Thresh.
Before threshing, it is important to make sure the grain and all parts of the plant being threshed are completely dry. If any part is green or moist it will not thresh properly and can wrap up around the threshing tool. So if it has any green, place it somewhere to dray where it will get plenty of airflow, hanging is a great way to dry. Green means it probably has moisture and moisture can cause the grain to spoil from mold, or something else.
Place your cut grain heads into a bucket, using just the grain heads is preferable. If you use more than that it takes longer to thresh and stems can get wrapped around the tool. I use a 5 gallon bucket, in another country though, a common size close to this might be 20 liter.
I usually fill the bucket I use with no more that 4 inches (10.16 cm) of grain in the bottom. The electric drill I have doesn’t seem to work well with more than this. Or it could be the design of this system itself that limits how much can be done at once.
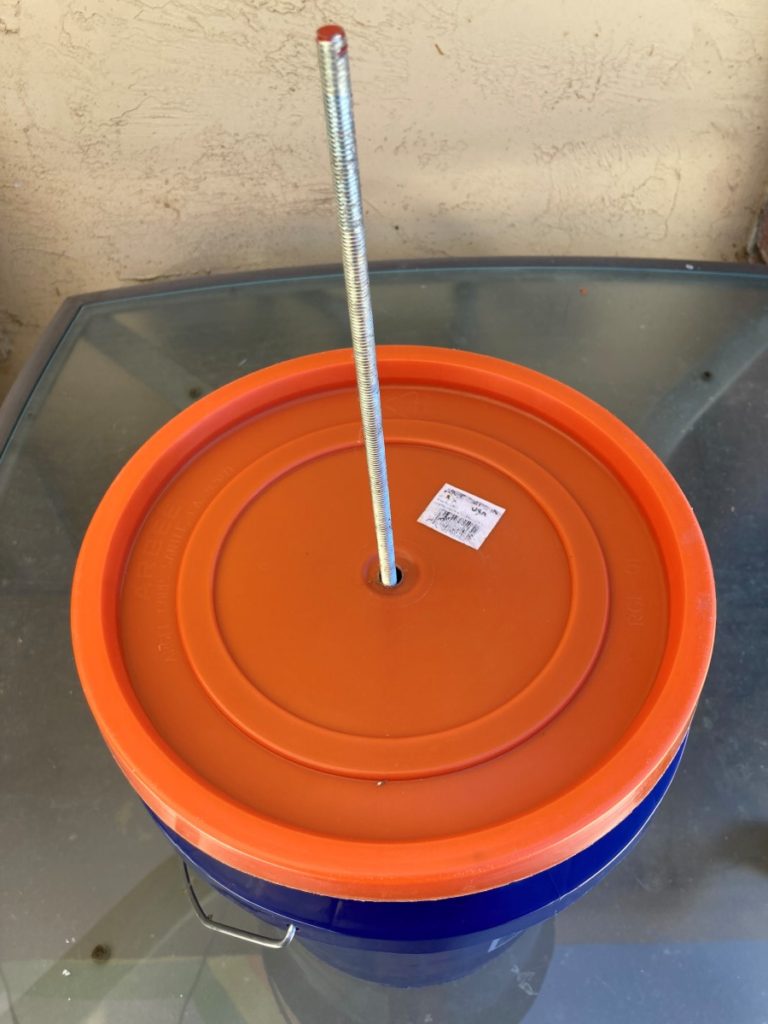
Take the threshing tool and feed it through the lid of the bucket, and then secure it into the chuck of the electric drill. Place the lid and drill combo onto the bucket and secure the lid to the bucket. If the lid isn’t secured, lots of dust will come out and even some of the grain can escape.
I usually tilt the bucket at a 45° and start the drill. At this point the tool will swing the chains out which will impact the grain heads and other plant material. The impact will start to knock grain out of the hulls and will also break down any of the other material into smaller pieces.
Be careful what speed you use as some grains are softer than others and can be broken if the speed is to fast.
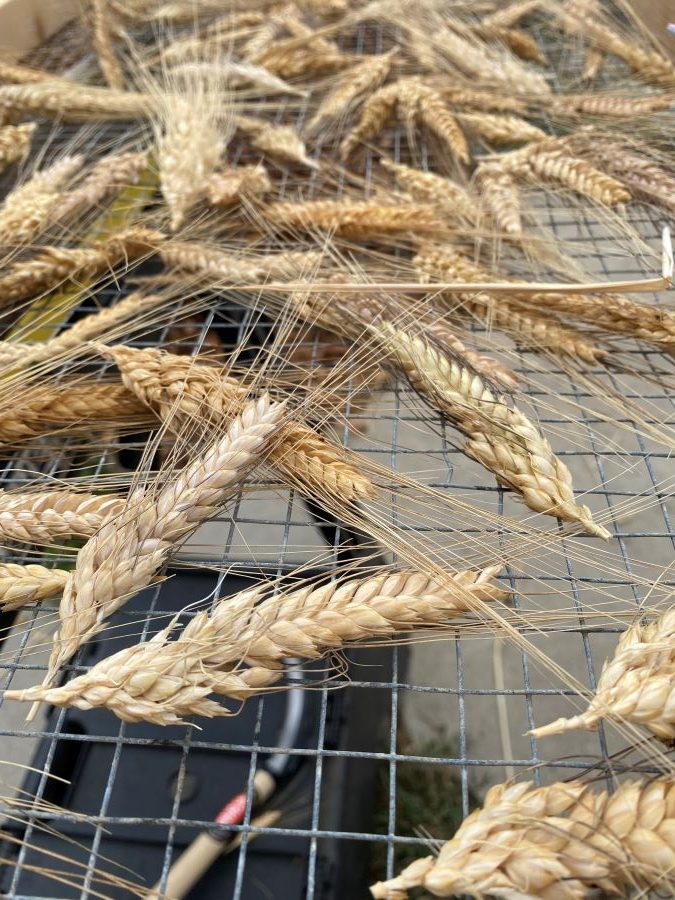
After threshing with the tool you should have something like the image below.’

Making the threshing tool.
In order to make the tool you will need a piece of all thread, 2 nuts, two washers and a small piece of chain. Each one of these can be found at most hardware stores.
For the all thread, I got a piece that is 5/16 inch in diameter and 24 inches long. The bucket is only 15 inches tall so that leaves me 9 inches of all thread that would stick out of the bucket lid.
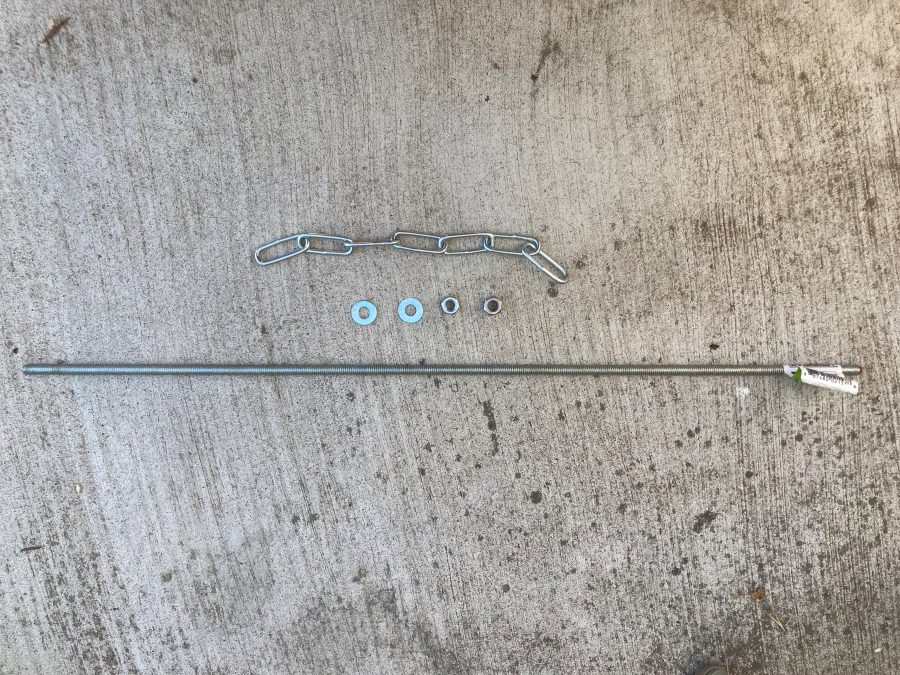
The nuts I used are also 5/16 inch, if they were anything different they wouldn’t fit. But the washers I used are actually labeled 1/4 inch and they fit the all thread perfectly.
For the chain you will need a length that is smaller the the diameter of the bottom of the bucket while at the same time having an odd number of links. So if the bottom inside of your bucket is 10″ in diameter, then you need to have a length of chain that is less than 10 inches. It also needs to be an odd number of links, it shouldn’t be even. The odd number will allow one link that the all thread goes through and then an equal number of links on both sides to help keep things balanced while spinning around.

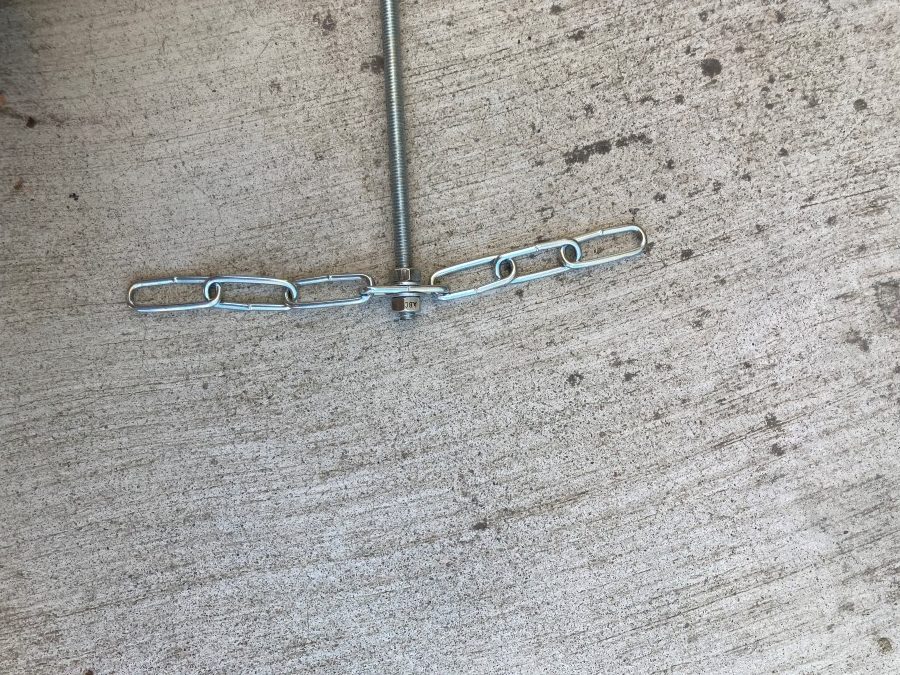
For instance if the chain was 7 links, one link will be for the all thread to go through and then 3 links would be on either side of the all thread.
The chain I chose to use has a hole that is just large enough to allow the all thread to be fed through without resistance. The important thing is that the all thread fits through the chain, and the nuts and washers can be tightened on the chain as I will show below.
So just to be clear, the size of the all thread needs to be the size that fits through the chain. It isn’t so important if it is 1/4 or 5/16 or 6 mm. They just need to fit together. so you may need to play around with sizes. The only thing is that I personally wouldn’t go smaller that 1/4 as it may wobble around to much because the all thread may have to much flex with such a small diameter.
To assemble your tool just thread one nut on the all thread and make sure to leave enough space for the other two washers, chain, and nut to fit on the all thread. After the first nut put on 1 washer, the chain, the 2nd washer and then the last nut and tighten it down with the chain centered as best you can.
I try and leave the chain as close to the bottom of the all thread as I can. I am not sure what kind of impact that has on the process though.
Winnowing: What is it and why does it need to be done.
So threshing was explained above, but what is winnowing exactly? During threshing the grain, along with the hull it is incased in, and maybe the stalk that the grain is attached to will all be banged around quite a bit. This will lead to many small particles being produced as hulls and stalks are broken down. Hopefully the grain will not be broken but some will almost always be broken
So after threshing there will be grain, bits of stalk and hull, and powdery pieces that look like sawdust left. The grain needs to be separated from this other material and this is where winnowing comes in.
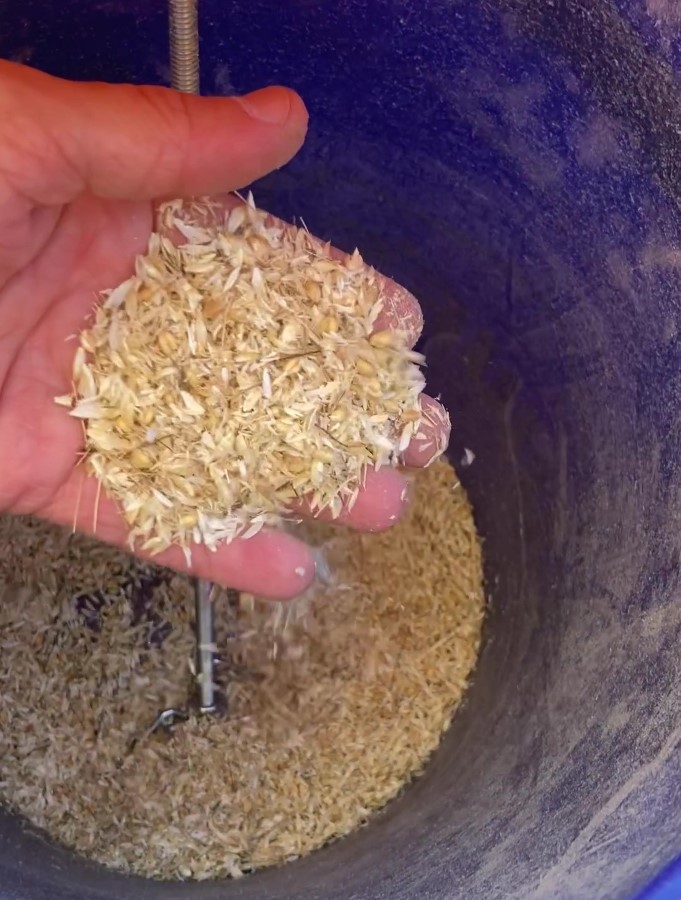
Winnowing separates the chaff, which is all the bits and powder, from the grain. A common way to do this back in the day was to toss the grain and chaff in the air and let the wind blow the chaff away. The chaff in general will be lighter than the grain so the wind will carry the chaff with it and the grain will stay mostly in the same place and fall back to the ground. Probably on a blanket or something though, not just on the soil.
Think of throwing a handful of sawdust and rocks in the air while the wind is blowing, a gentle wind not anything crazy. You can probably imagine what would happen right? The wind will carry most of the sawdust away and the rocks will just fall back down.
Tossing the grain up into the air and letting the chaff blow away needs to be done over and over until all the chaff is gone and only grain is left. This takes a long time, and the wind may not be blowing, so this is not the best way to do it at home or at a homestead if you have something called electricity. Luckily for most of us we have electricity and modern tools.
How to winnow grain at home. Winnowing with a fan and bucket.
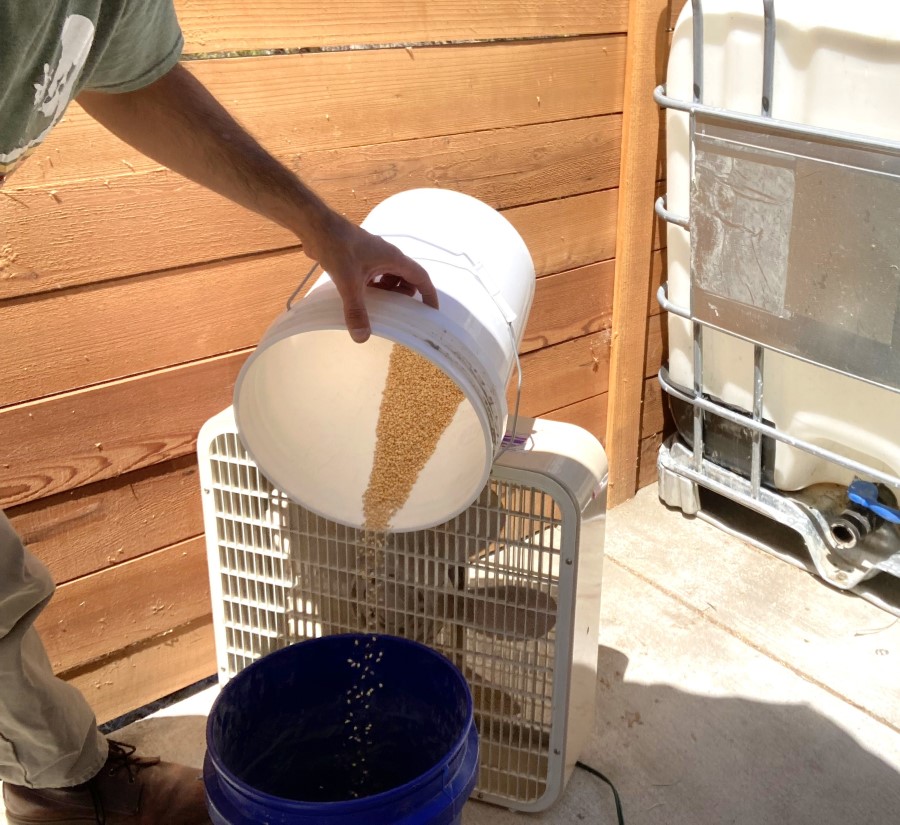
For winnowing at home all you need is a fan, and two buckets or bins, or anything that will allow you to pour the grain back and forth.
A large fan is preferable and works well because it moves more air at a lower speed than a small fan can. Meaning, it does not need to be on full speed, and will be less likely to blow seed away because the air speed will be slower. A small fan may need to be on full speed to blow the chaff away because it is moving less air and the area of wind from the fan is small. This can lead to the grain being blown away, because it will be tempting to put the fan on full.
Let me try to explain the benefit of size a little better. If two fans are set to a speed where air speed is the same speed, and 1 of the fans is 4 times the height and width of the other. Now imagine if you pour your grain and chaff in front of each fan, with your pour point (height) being just above the fan height on each of them. The large fan will allow the grain and chaff to fall 4 times the height of the small fan allowing it to be in the wind much longer. This allows more chaff to be blown away with each pour.
With the small fan it would be 1/4 the height which would only allow the grain and chaff to be in the wind for about 1/4 the time of the large fan. Meaning less chaff will be blown away in the same time. To blow the same amount of chaff away the small fan would need to be set to a higher speed. This may lead to grain being blown away.
I should mention really quick that winnowing is something to do outside, it blows debris and dust everywhere.
Set your fan up an an area outside, pointed so that the wind from the fan blows with any wind you may have outside, don’t fight the wind or you will end up getting it all the chaff blown back at you. Place one bucket in front of the fan, and if the height of the bucket is taller than about 3/4 the height of the fan, the fan may need to be elevated by something. Turn the fan on low to start, and turn it up if you need to, as you get a feel of how this works with your fan.
Place the threshed grain in the other bucket or bin, pick it up and then pour it into the other bucket/bin in front of the fan, which is on. I usually try and poor the grain into the portion of the bucket closest to the fan. That way if the fan speed is to fast or there is a small gust of wind outside it doesn’t blow all the grain outside of the bucket.
You will need to keep pouring the grain back and forth from one bucket to the other in front of the fan until all the chaff is removed. If any of the grain still have hulls on them, another threshing or a few threshing may be needed.
Winnowing is where the technique needs to be learned so you don’t lose your grain. Just take it slow and try to get a feel of how it works. You will learn how high up to hold the bucket while pouring, how fast to pour, and what setting the fan should be set to. I find a slow speed with a little shaking of the bucket works well with the fan I use. It just takes a little practice.
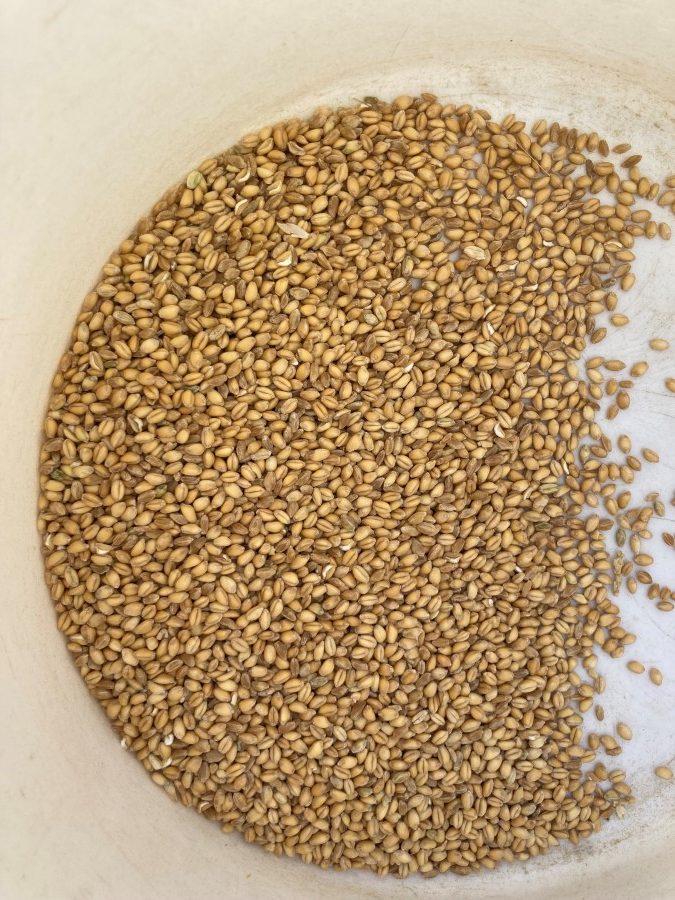
When you are done you should have something that looks like the image below.
I hope this was informative, now go make some bread or something.